
How to print business cards at home
Free in your browser, nothing to install: try this in BoboCreate Online.
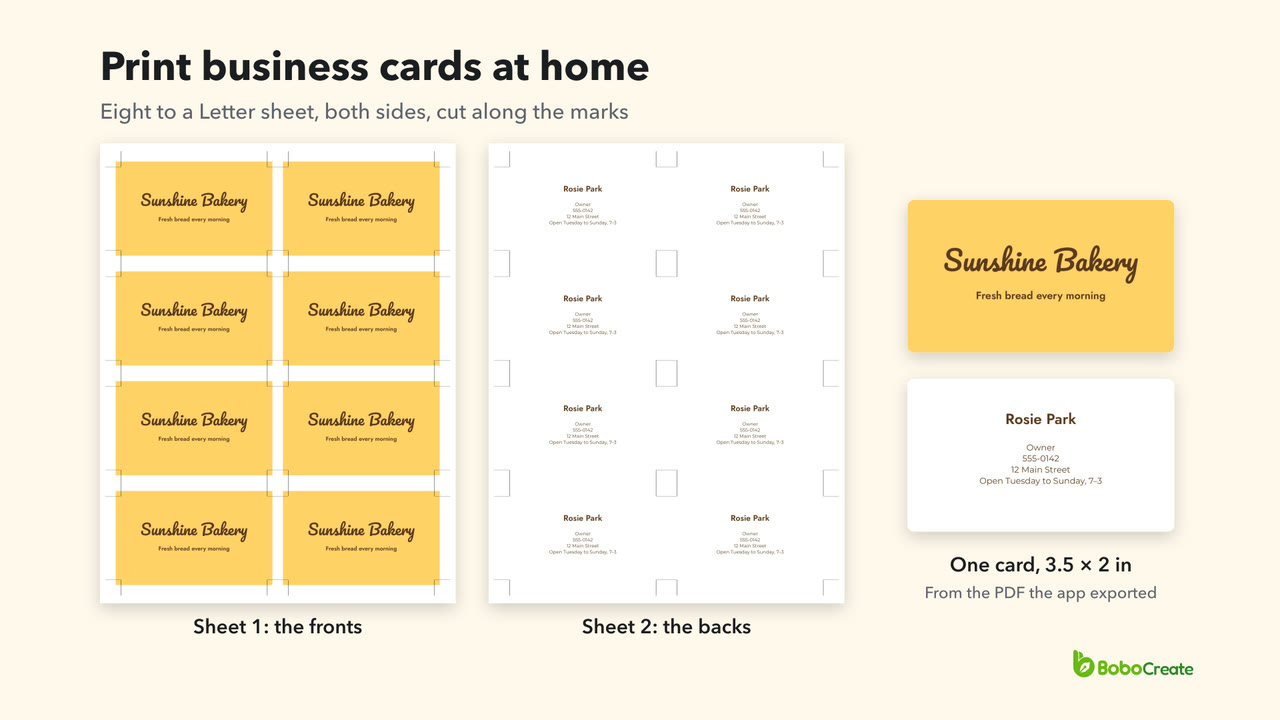
To print business cards at home, design a 3.5 × 2 in card, then export a PDF on Letter with Print more than one to a sheet, Include bleed and Show trim marks ticked. You get eight cards to a sheet, with the backs on a second sheet in the same places. Print it on both sides of card stock at actual size, and cut along the marks.

What you need
- Card stock your printer can take. Its manual says how heavy a paper it takes, and from which tray.
- A metal ruler, a craft knife and a cutting mat, or a paper trimmer.
Make the front
-
Start a business card
In the library, click New design. Type business in Size, choose Business card 3.5 × 2 in, give it a Name, and click Create. Resolution is already 300 DPI — print, which makes the card 1050 × 600 pixels.

-
Click Safe margin
It's under Guides in the panel on the right. Four dashed lines appear, 0.25 in inside the edge. Keep your words inside them, so a cut that's a little off can't reach them. Guides never print or export.
-
Give the page a colour
With nothing selected, the panel shows Page 1 · Background. Type a code in Colour: here it's #ffd166, a warm yellow.

-
Add the name
Click Text at the top and type in the box under Text style. Click the font's name, type part of the one you want, and click it. Here it's Pacifico, at Size 26 pt, colour #5b3a1e, a dark brown. On a card, Size is in points, as in print.
-
Move it with Y
Under Transform, Y is how far the text is from the top of the card, in inches. Here it's 0.62. A new text box starts centred on the page, so there's nothing to line up across.
-
Add a second line the same way
Here it's Fresh bread every morning in Jost SemiBold, 10 pt, at Y 1.18.

Add the back
-
Click Add a blank page
It's the first button after the page number, in the bar under the card. Page 2 is the back. It starts white, and stays white here.
-
Add the words for the back
The same way as the front: here the name, Rosie Park, in Jost SemiBold at 14 pt and Y 0.42, and the details in Montserrat at 8 pt and Y 0.84. Press Enter in the box for each new line.

Export eight to a sheet
-
Click Export, then PDF
Export is at the top right.
-
Set Page size to Letter
Choose 8.5 × 11 in (Letter). The note under it says One per sheet, centred — up to 12 fit.
-
Tick Print more than one to a sheet
Keep Repeat the same page. The preview fills with 12 cards, turned a quarter turn.
-
Tick Include bleed
Each card's colour now runs 0.125 in past its edge, so a cut that's a little off still lands on the colour. The bigger cards fit eight to a sheet, upright, two across and four down.
-
Tick Show trim marks
Short lines appear around the cards, on the lines to cut along. Still eight to a sheet.

-
Look at sheet 2
Click the arrow under the preview. Sheet 2 of 2 holds the backs: eight copies of page 2, in the same places as the fronts.
-
Click Export PDF
Choose where to save the file. The line at the top then says it saved 2 pages on 8.5 × 11 in (Letter), 8 to a sheet.

| Letter, nothing ticked | 1 per sheet; the note says up to 12 fit |
|---|---|
| Print more than one to a sheet | 12 per sheet (4 × 3), turned a quarter turn |
| … and Include bleed | 8 per sheet (2 × 4), upright |
| … and Show trim marks | 8 per sheet |
Print both sides
-
Load card stock
In the tray the printer's manual gives for heavier paper.
-
Print at actual size
In the print settings, choose Actual size or 100%, not Fit to page or Shrink. Scaled to fit, the cards come out smaller than 3.5 × 2 in.
-
Print two-sided, flip on long edge
Some printers call it long-edge binding. The eight cards sit in the middle of the sheet, upright, so a flip on the long edge puts each back behind a front, the right way up.
The names and places of these settings differ from printer to printer and app to app.
If your printer can't print both sides, print page 1 only, put the printed sheet back in the tray turned over, and print page 2. Which way to turn it depends on the printer: draw a small arrow in pencil on a plain sheet first, and see where it comes out.
Either way, print the two sheets on plain paper first and hold them up to the light. Each back should sit behind a front. A printer can shift the paper a little between the two sides, and a plain white back, like the one here, hides that better than a border close to the edge.

Cut them out
With a metal ruler and a craft knife
On a cutting mat, lay the ruler across the two marks at the ends of one edge of a card, and cut along that edge from corner to corner. Then the next edge, and the next card. The rest of the sheet stays in one piece, so every mark is still there for every cut, and each card drops out when its fourth edge is cut.

With a paper trimmer
A trimmer cuts right across the sheet, and the marks for the cuts the other way go with the piece it cuts off. So cut in this order:
- The top and bottom lines, using the marks at the left and right edges of the sheet.
- The left and right lines, using the marks in the gaps between the rows.
- Both sides of the gap down the middle, using the same marks. You now have two strips of four cards.
- Each strip into cards. Its marks are gone, so measure from a cut end with the trimmer's ruler: a card is 2 in, and in this PDF the gap between two cards is 5/8 in.
Where it goes wrong
- The cards come out smaller than 3.5 × 2 in. The PDF was printed scaled to fit the paper. Print it at actual size, 100%.
- The backs are upside down. The printer flipped on the short edge. Choose flip on long edge.
- The backs don't line up. Check the printer's two-sided setting first, then print the test on plain paper again. A little shift is the printer, which is why a plain back is safer than a border.
- A white line along one edge. The PDF had no bleed, or the cut was more than 0.125 in off. Tick Include bleed and export again.
- Words too close to the edge after cutting. They were outside the safe margin. Move them inside the dashed lines.
- The printer won't take the card stock. It may be too heavy for that tray. The printer's manual says which tray and which paper.
Questions
Why eight to a sheet, not twelve?
Twelve fit only without bleed: 4 × 3, turned on their side. That suits a card with a white background and nothing near the edge, printed on one side. With bleed, each card takes 3.75 × 2.25 in on the sheet, and eight fit, upright. Upright is also what makes a long-edge flip put the backs the right way up.
Do I need trim marks?
For cutting by hand, yes: they are the only lines on the sheet that show where each card ends, because the bleed hides the edge.
Start it free in your browser
Design the business card online. Putting eight on a sheet with bleed and trim marks is done in the BoboCreate app.
BoboCreate Online is free, with no account. Its downloads carry a small “Made with BoboCreate” mark; the BoboCreate app exports without it, and adds photos, video, cutting files and print quality.